![[*]](footnote.png) . All the tools running on the host, but used to create, analyze
or debug for the target are kept in this directory. All addon headers and
libraries are installed to this directory.
. All the tools running on the host, but used to create, analyze
or debug for the target are kept in this directory. All addon headers and
libraries are installed to this directory.
Welcome to FreeWRT! This handbook covers the building, installation and usage aspects of the FreeWRT 2.0 Linux distribution. FreeWRT is a portable, secure and functional Linux distribution for embedded systems. As FreeWRT is a source code distribution, it does not provide any pre-compiled firmware for embedded systems. The latest version of this document is always available at the FreeWRT website. If you have any comments, criticism or found some wrong description, please send me an e-mail to wbx@freewrt.de, I am always happy about getting feedback to this document, and will try to update or correct the issues mentioned by you.
The FreeWRT User handbook is split into several distinct chapters. ch:ADK covers the building of FreeWRT firmware images. In ch:installing, ch:installing, all aspects regarding the installation and deinstallation of FreeWRT firmware images are covered. The next chapter, ch:administration, covers administrational tasks, such as network configuration, the FreeWRT configuration filesystem, package management and update mechanism. The last chapter, ch:troubleshooting, helps troubleshooting problems and recovering a bad firmware installation.
The intended audience for this handbook are advanced users with basic knowledge about Linux, networking and software development. The reader should be aware of basic command line tools, the vi editor and a shell. FreeWRT does not contain any high level administration tools (e.g. web based administration) and is fully configured via command line.
Examples starting with # indicate a command that must be invoked as super user. You can use su to gain super user privileges.
[label=example for a command line with super user privileges]
# fwcf commit
Examples starting with $ indicate a command that can be invoked as a normal user. The default user account on a freshly installed FreeWRT system is "admin", the password "FreeWRT".
[label=example for a command line as non-privileged user]
$ cat /etc/banner
The ADK is the core of FreeWRT and contains all scripts and sources to create firmware images for every supported embedded system. FreeWRT 2.0 supports the following WLAN routers:
In this release we only support the Linux 6.12.x kernel. The ADK contains over 320 software packages.
Here is a list of all supported and tested host systems. The host system is needed to create a firmware for your embedded system.
The list of supported GNU/Linux build systems is not an exclusive one, these are just the ones tested and verified. The other millions of linux distributions are very likely to work, too.
Please install the following software, which is needed to build a basic firmware image. If you choose more packages some more prerequisites might be needed. The ADK host checks will warn you about any software you need to install to compile a specific package. Here is a list of the required software:
The ADK scripts will check for the required versions of these tools in advance.
To build FreeWRT with the ADK it is recommended to have an unprivileged user. Please never build FreeWRT as super user. Because all necessary source tarballs are downloaded from the internet automatically, your host system needs a working internet connection.
Now go to a directory where you want to build the firmware. Depending on the features you select you will need about 2.5–5 GB free disk space. This includes the ADK itself, any source archives which will be downloaded and their extracted copies (for compiling).
To get the latest stable FreeWRT ADK try one of these commands:
[label=Check out FreeWRT ADK via HTTPS protocol]
$ git clone https://git.freewrt.de/git/freewrt
After successfully downloading, enter the directory:
$ cd freewrt
This directory will be referred to as the ADK root later on.
Building a FreeWRT firmware image is just like building a new Linux kernel, but a little more complex. There is a ncurses-based configuration menu at the beginning, the changes made are saved into a file named .config in the ADK root. The build is done by the various Makefiles, compiling and linking the sources together accordingly to the symbols defined in .config.
Unlike kernel compilation, FreeWRT needs to be cross-compiled. This leads to special premises, as most of the tools need to be specially build. But no panic, FreeWRT will do this all for you. In fact, this is done at the second run of make (the first one opens the configuration), and therefore can be seen as part of the first firmware build. For clarity though, we will discuss these two things separately.
After downloading the FreeWRT ADK, it's time to prepare the ADK for the building of firmware images (for explanations see the chapter above).
The first step is to run make. After checking some prerequisites (see ch:troubleshooting below for aid in problems), a console based configuration menu should start. Theoretically no choices have to be made, but it's proven useful to at least:
Then quit saving changes. If you forgot that, just run make menuconfig again, redo your changes, then save.
Now that you have a first minimal configuration, it is time to build the toolchain for cross-compiling. To do this, just enter make again. The build starts downloading and compiling each needed part of the toolchain, and later continues with building the first firmware image. Later one can be taken as proof of a working ADK.
Already experienced in compiling gcc? Then you know...If not, better be told that it takes really long to finish. In the meantime I suggest reading the next chapter dealing with internals about cross-compiling.
A cross-compile toolchain exists of a set of tools: a compiler, linker, assembler, debugger and a C library. A cross-compile toolchain runs on your host system and creates native binaries for your target system. A cross-compile toolchain is basically created in six steps:
The cross-compile toolchain is created in
staging_dir_$(cpu_arch). All the tools running on the host, but used to create, analyze
or debug for the target are kept in this directory. All addon headers and
libraries are installed to this directory.
If you want to compile a simple application without using the ADK, just use the compiler directly (e.g. compiling a MIPS Little Endian application):
[label=compile a simple application with the cross-compiler]
./staging_dir_mipsel/bin/mipsel-freewrt-uclibc-gcc -o myapp myapp.c
Check with the tool file if you got a MIPS binary:
[label=check the binary with \app{file}]
$ file myapp
myapp: ELF 32-bit LSB MIPS-I executable, MIPS, version 1 (SYSV), dynamically
linked (uses shared libs), not stripped
Your local copy of the FreeWRT ADK should now be prepared for building firmware images. The next step is to do an extensive configuration for the image you want to create. To start the configuration menu, type make menuconfig.
When selecting packages, <*> means it will be inserted into the firmware image and <M> means it will be build as an addon package which can be installed later at runtime (only if you use read-write jffs2 root filesystem).
The target device and filesystem should already been chosen by you to the right value, if not you will have to issue a make clean before actually building the firmware image. Otherwise things get messed up. A smooth rebuild is a missing feature in the current ADK. For the packages, if unsure, you can just select one of the package collections. After that, you can still manually check the choices made by the collection and correct them if appropriate. Do not forget to save your configuration when leaving!
After leaving the menubased configuration, type make again to build the new FreeWRT firmware image. Depending on your package selections and underlying hardware, this will take different amounts of time. For your spare time there is the following chapter giving some explanation about what is done at this point.
Just like when building the ADK's toolchain, the sources for the selected packages are downloaded from the internet first, then built using the cross-compiler and libraries of the ADK.
The detailed order of firmware image building is:
The result of the build process is created in the directory bin/. You will find a firmware image in the top level directory. Check the size of the binary image file to see if it is small enough to fit into flash memory of your WLAN router. Furthermore there is a directory package/, which contains all base and add–on packages.
This section deals with various tips for problems with the ADK installation.
To re-issue the checks, use make prereq.
[label=error message with too old GNU make]
   $ make
   GNU make 3.80 too old.
   Please install GNU make 3.81 or higher to continue.
   You can override this check, see http://www.freewrt.de for details.
   It is suggested to upgrade your copy of bison to
   GNU Bison 2.3 because of its bug fixes.
   make: *** [.prereq_done] Error 1
it is quite a nice error that tells you to use more up to date software, but we can anyhow give this hostsystem a try and tell make to ignore those errors/warnings running make prereq-noerror.
If you encounter any compilation errors, then first try to reproduce the error. First update your ADK tree via git pull, to be sure that the error is not already fixed in the GIT repository. After that do a make clean && make, to reproduce your problem.
If you can reproduce the problem, please file a bug report. Please always report following information:
The FreeWRT ADK produces a single image holding both kernel and root filesystem. This image can be written into your hardware's builtin flash memory on serveral ways (ordered by needed skills, increasing downwards):
The following text describes how to use the original firmware's web interface to flash FreeWRT. The object of demonstration is an ASUS WL500GP, but this guide should fit more or less fine for other systems, too.
If you flash a router from LINKSYS, we strongly suggest to use the popular PING EXPLOIT to allow recovery, if your image is broken or the flash process was interrupted by a power shortage.
There are some things that you should have done previously:
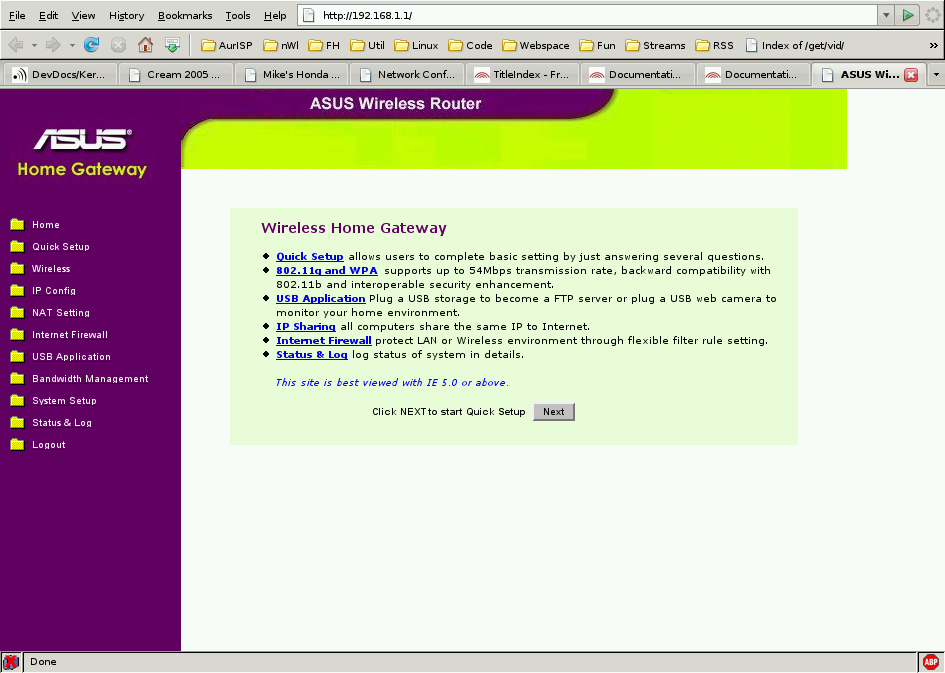
After preparation is complete, open your favourite browser and type 192.168.1.1 into the address bar. You should reach the web interface's startup page:
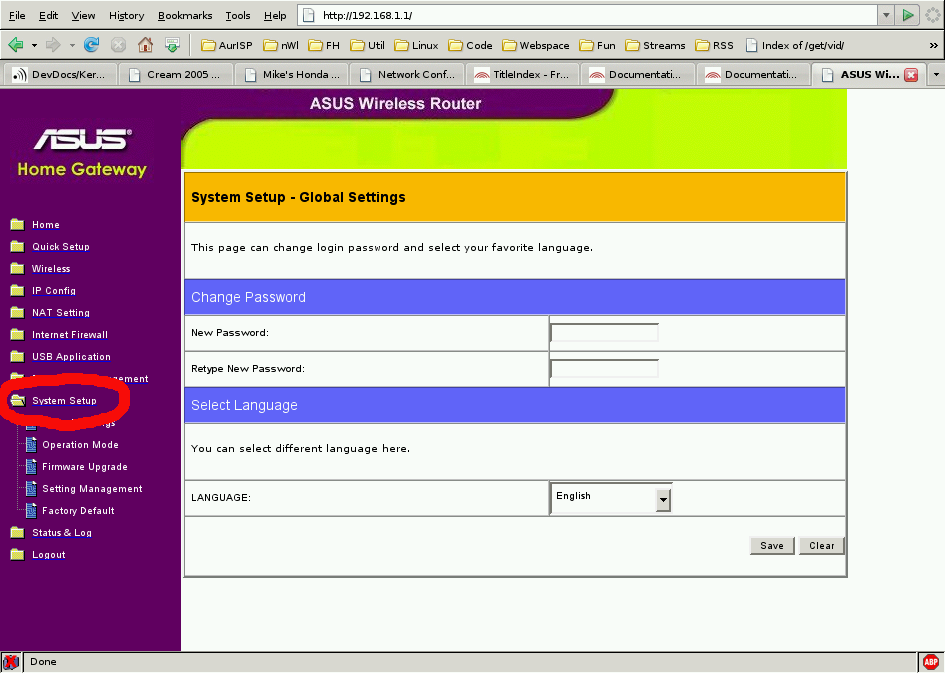
Then click on System Setup:
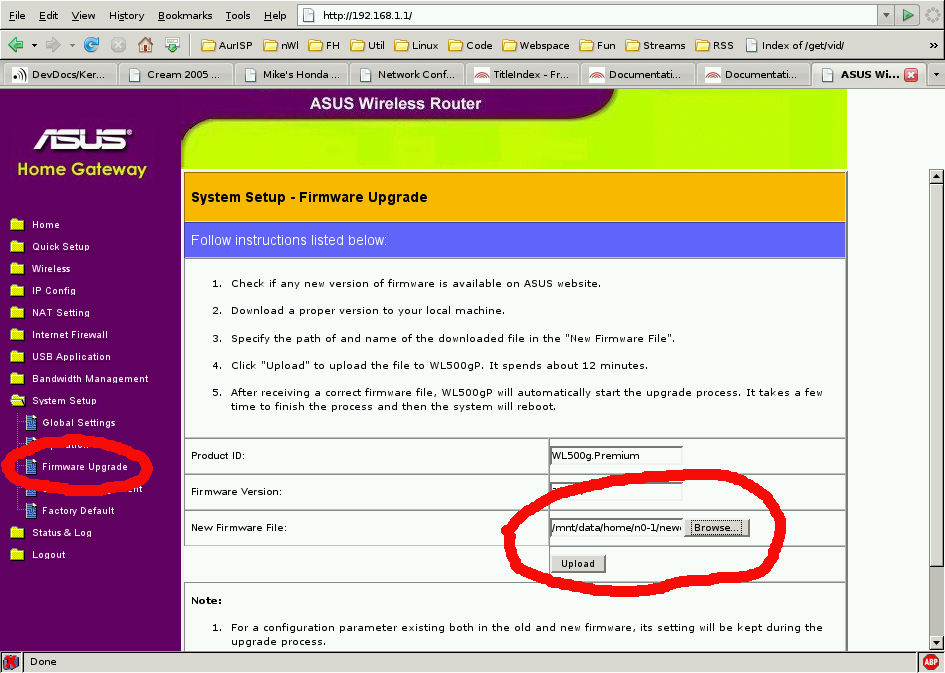
In the new menu click on Firmware Upgrade, and enter the name of your firmware image into the appropriate field:
When everything went well, you can login using ssh. The default username is "admin". The default password for images created via ADK is "FreeWRT". It is possible to change this password in the ADK, before image creation.
For this method to work, you need to copy the file containing the firmware image to the router, preferably into /tmp/, the memory filesystem should be big enough to hold the full image. If not, use wget to get the image via http or ftp and pipe the result into mtd.
Then the image is written to flash using mtd, optionally giving additional options (see below).
The mtd utility was written with simplicity and code size in mind. It's features were derived from the mtd-utils, combining the needed parts into a single small tool providing all the functionality necessary for FreeWRT, and leaving everything out that's not.
mtd provides the following features:
Further it can request your system to reboot. Some of the features mentioned here can also be combined, so it is e.g. possible to immediately reboot the system after the flash has been written.
Mostly, similar to the sample usage shown in the help output should be all that has to be done to write the firmware to flash:
[label=write a previously downloaded new firmware-file into flash]
# mtd -e firmware -r write freewrt.bin firmware &
Or via wget pipe:
[label=download and write a new firmware-file into flash]
# wget -O - http://www.yourserver.com/freewrt.bin | mtd -e firmware -r write - firmware &
The parameters explained in detail:
All supported target devices are shipped with a builtin bootloader, comparable to the BIOS of X86 machines. This bootloader is used to bootstrap the system until it can boot an regular operating system. Besides the ability to load the executable code from flash, it can be received from another node in the local area network via the famous TFTP protocol.
For doing this, there are two ways:
Most of the hardware supported by FreeWRT 2.0 uses the second method. Only the device NETGEAR WGT634U is using the first method, the bootloader provides a DHCP/TFTP client. Though this may be a little confusing to people being familiar with netboot technologies, it is definitely the easier way of doing it. Otherwise one had to setup both DHCP and TFTP servers and configure them right.
The even quite simple task of sending the flash image to the target device is made even more easy by providing a little shell script for the job. Invocation is as follows:
[label=sending the new firmware via TFTP]
$ ./scripts/flash.sh firmware.bin [address]
The second Parameter address is used to specify a different IP address of the target device than the default 192.168.1.1.
Beware: do not rename the firmware image before flashing it using the script as the original name is parsed to guess what hardware is to be flashed.
To actually being able to flash the device, it has to wait for a tftp
connection when booting. To complicate installation of third vendor's firmware
images and to improve bootup time, of course, this feature is disabled by
default. The following list shows what has to be done for a certain device to
get it to wait at boot:
| Target Device | Action to be taken | Comments |
|---|---|---|
| All supported Linksys models | Ping Exploit | nvram variable boot_wait needs to be on |
| All supported Asus models | Recovery mode | power off  push and
hold the reset button
power on power led is
flashing push and
hold the reset button
power on power led is
flashing |
After the FreeWRT firmware image has been built by the ADK and later flashed onto the hardware, the resulting operating system has to be configured. This section provides the necessary information to do that, including tips and guides for using FreeWRT in general, of course.
The device names for real network interfaces in Linux are named ethx (x is 0–9). If the device has a switch, the different ports are separated via VLAN technology. The vlan interfaces are named ethx.y. The network configuration in FreeWRT is managed via Busybox's ifupdown implementation. Busybox's builtin ip command configures the network interfaces. There is no ifconfig or route, you can activate it in the ADK menu, if you like.
To show all configured network interfaces use:
[label=show IP address]
$ ip addr show
To show the kernel routing table use:
[label=show routing table]
$ ip route show
All available network settings can be found in /etc/network/interfaces which has the common form:
[label=common form of \file{/etc/network/interfaces}]
auto <iface-name>
iface <iface-name> inet <method>
  <option-x> <value>
  <option-y> <value>
  <option-z> <value>
<b>ATTENTION: Be sure you have no whitespaces at the and of any value!</b>
auto <iface-name> is optional and, if set, tells the ifup script to start this interface automatically on bootup.
Each interface needs a unique name which, depending on the method, represents either a physical interface or a logical interface name like eth0.1 for a physical VLAN or umts as a logical name for a PPP interface.
Possible methods are:
[label=\file{/etc/network/interfaces}]
auto eth0.0
iface eth0.0 inet static
    switch-ports 1 2 5*
    address 192.168.1.1
    netmask 255.255.255.0

auto eth0.1
iface eth0.1 inet static
    switch-ports  3 4 5
    address 192.168.2.1
    netmask 255.255.255.0

auto eth0.2
iface eth0.2 inet static
    switch-ports 0 5
    address 172.16.1.42
    netmask 255.255.255.0
    gateway 172.16.1.1
This configures three VLAN interfaces eth0.0 on ports 1 and 2, eth0.1 on port 3 and 4 and eth0.2 on port 0.
If you need to do some advanced settings, because you have for example a powerful switch with a VLAN trunking port connected to one of your switch ports, the configuration would look like this:
[label=\file{/etc/network/interfaces}]
auto eth0.1
iface eth0.1 inet static
    switch-ports 2 3 4 5*
    address 192.168.1.1
    netmask 255.255.255.0

auto eth0.2
iface eth0.2 inet static
    switch-ports 1t 5
    address 10.2.0.1
    netmask 255.255.255.0
    broadcast +

auto eth0.3
iface eth0.3 inet static
    switch-ports 1t 5
    address 10.3.0.1
    netmask 255.255.255.0
    broadcast +

auto eth0.4
iface eth0.4 inet static
    switch-ports 1t 5
    address 10.4.0.1
    netmask 255.255.255.0
    broadcast +
This configures four VLAN interfaces, eth0.1 on physical ports 2, 3 and 4. The interfaces eth0.2, eth0.3 and eth0.4 are three different networks with VLAN ID 2–4. The physical port 1 needs to be connected to a VLAN trunking port on a switch with knows the same VLAN IDs.
Explanation:
[label=\file{/etc/network/interfaces}]
auto eth0.1
iface eth0.1 inet dhcp
    switch-ports 0 5
Typically this configures the WAN-Port to start a DHCP request on bootup.
For AP mode and WEP/WPA/WPA2/WPA3 you need to select, configure and run hostapd.
PPP comes in various flavours for different situations, the most commonly needed will likely be DSL and for WRT54G3G users UMTS. So there exists a hook-script that evaluates a use-template option and generates a ppp-peer. This way everything needed so far can be configured within the interfaces file. Be sure you have installed the packages kmod-ppp, ppp and ppp-mod-pppoe. For providers using PPTP for authentication, instead of PPPoE, you need to install pptp.
[label=\file{/etc/network/interfaces}]
auto ppp0
iface ppp0 inet ppp
        use-template dsl
        provider foobar
        ppp-username 1234567890121234567890120001@bar.de
        ppp-password bar
        ppp-device eth0.1
Now your DSL connection will be started on boot (auto ppp0) and you can manually shut it down with ifdown ppp0 or start it up with ifup ppp0. The template dsl will configure a typical PPPoE peer for you.
[label=\file{/etc/network/interfaces}]
auto ppp0
iface ppp0 inet ppp
        use-template pptp
        provider foobar
        ppp-username foo
        ppp-password bar
        ppp-modemip 10.0.0.1
        ppp-mtu 1480
        ppp-device eth0.1
Now your DSL connection will be started on boot (auto ppp0) and you can manually shut it down with ifdown ppp0 or start it up with ifup ppp0. The template pptp will configure a typical PPTP peer for you.
[label=\file{/etc/network/interfaces}]
iface ppp0 inet ppp
        use-template    umts
        provider        umts
        #ppp-username   ""
        #ppp-password   ""
        ppp-device      /dev/noz0
        umts-apn        web.vodafone.de
        umts-pincode    1234
        umts-mode       umts_first
As you can see: unneeded options like ppp-username or
ppp-password can just be removed or commented out. Don't leave them
without a value as that causes a failure in ipup. It does work if you
give empty double quotes as value like "".
Note that you have to set the correct APN, username and password for your provider!
You may also remove the pin from your SIM-card and the configuration if you like.
For LINKSYS WRT54G3G a package called broadcom-watchbutton will be installed, this is a small daemon that monitors the UMTS-button of the router and executes ifup umts or ifdown umts on a button press. You have to set watchbutton=YES in /etc/rc.conf to have it start automatically.
This is totally independent from the auto umts setting. Even if you start the connection on bootup you can shut it down again with a button press.
[label=\file{/etc/network/interfaces}]
iface foobar inet static
    [...]
    pre-up <command>
    up <command>
    up <command>
    down <command>
    post-down <command>
You can give each option multiple times and their commands will be executed in given order.
FWCF is a separate flash partition for all changes made to the /etc/ directory. There is a small tool named fwcf, which is used to setup the system or to commit changes to the fwcf partition.
On bootup a script is executed, which calls fwcf setup to setup /etc/ as memory filesystem and overlay the changes committed to the fwcf partition.
If you change anything in /etc/ and like to keep the change, it is required to execute fwcf commit. This will compress all changed or new files in /etc/ and write the result into the fwcf partition. The fwcf partition is 256 Kb in size. This size is not changeable at the moment.
If you need more detailed information, please read the specification of FWCF.
If you want to remove all your changes and start your configuration from scratch, use fwcf erase. This is also required if you switch between compression plugins. Right now LZO plugin is default.
All software for FreeWRT is available as a IPKG package. IPKG is a package manager very similar to Debian's dpkg/apt-get utilities. It is specially designed for embedded systems and is widely used. The FreeWRT project use a special version, which is embedded to the busybox binary. Normally the command line tool ipkg is pre-installed.
IPKG uses a configuration file similar to /etc/apt/sources.list, which contains a list of software repositories available via HTTP or FTP.
To update the list of available packages execute following command as root:
[label=update list of available packages]
# ipkg update
This command requires a working internet connection, because it will fetch a package list from every repository declared in /etc/ipkg.conf. It is also only working for JFFS2 based root filesystem. For squashfs root filesystem embed your application and reflash.
To install a new package use following command:
[label=example installation of \app{tcpdump}]
# ipkg install tcpdump
This will install the package tcpdump and all dependencies onto the flash.
You can also remove packages, but this is only useful if you are using jffs2 as root filesystem:
[label=example removal of \app{tcpdump}]
# ipkg remove tcpdump
This will not remove any dependencies, installed earlier. For example, libpcap is still installed after executing this command. On jffs2 root filesystem you should never remove any essential packages like busybox, fwcf or uclibc, otherwise you make the WLAN router unusable.
Nearly the same as for removing packages, counts for ipkg upgrade. Please never ever use ipkg upgrade to update your WLAN router. This command is only useful to upgrade single packages on a jffs2 rootfile system.
Some of the available packages containing software which start services at boot time. For that we provide simple startup scripts, which are installed into the directory /etc/init.d. See following example for the package dnsmasq, a combined dns and dhcp server daemon:
[label=\file{/etc/init.d/S50dnsmasq}]
#!/bin/sh

. /etc/rc.conf

case $1 in
autostart)
        test x"${dns_dhcp:-NO}" = x"NO" && exit 0
        exec $0 start
        ;;
start)
        [ -f /etc/dnsmasq.conf ] || exit
        /usr/sbin/dnsmasq
        ;;
stop)
        killall dnsmasq
        ;;
restart)
        $0 stop
        $0 start
        ;;
*)
        echo "Usage: $0 {start | stop | restart}"
        ;;
esac
exit 0
After installation the package postinst script will add all needed changes to the /etc/ directory. For example packages can add new user and groups, add new variables to /etc/rc.conf or just add new values to existing files as /etc/services. It is FreeWRT policy not to start any services after installation or in case of a new boot. To start services on bootup you need to set $servicename=YES in /etc/rc.conf and commit your changes via fwcf commit. For every policy exists an exception, we start all essential services by default, like ssh daemon, syslog and network initialisation.
For some services you can control the startup behaviour by modifying the $servicename_flags variable in /etc/rc.conf.
For example the variable $ssh_opts is provided as an argument to the dropbear ssh daemon to control its behaviour.
Having this policy helps you to configure your FreeWRT embedded system without shooting yourself in the foot. For example if you try to realize a firewall system and trying to set the rules in /etc/firewall.conf, which is read by /etc/init.d/S45firewall, if the iptables package is installed. You can just reload the changed ruleset via /etc/init.d/S45firewall restart. If you managed to kick you out of the system, you can just reboot the system and you gain access again. As soon as your are ready with the firewall configuration and you decide to activate the firewall rules on bootup, you set firewall=YES in /etc/rc.conf, commit your changes via fwcf commit and reboot. Now the firewall rules will be activated on bootup.
Administered networks often make use of a central Log Server to store the SysLog output of the local servers. This is also a good approach when setting up a Log Analyser or IDS.
To enable sending SysLog output via network for syslogd, simply alter it's flags in /etc/rc.conf. Use -R Host[:Port] to send all messages to Host, and Port (optional). To keep the messages locally also, give -L as additional flag.
Many routers now ship with USB onboard, which makes them fine for dealing as a fileserver. If you have such a device and want to setup your own low–cost NAS, follow the instructions below.
What you need is:
When all prerequisites are met, all that has to be done is to connect the USB mass storage device to the USB port of the router. FreeWRT provides a hotplugging script which mounts all connected partitions under /mnt/discN_Y while N is the index of the connected disk (i.e. starting with 0) and Y is the number of the partition on the disk (i.e. starting with 1).
There are two implementations available, one residing in kernel space and another one implemented purely in user space. If you wish to use the user space implementation of NFS, just enable nfs-server. To use the kernel implementation of NFS, activate nfs-utils for your target. Although kernel space is somewhat faster, this implementation has the drawback that only directory structures within a single mount point can be exported. So you have to supply at least a single entry for each mounted partition in /etc/exports. (Using the user space nfsd, you can also export the complete /mnt directory.
[label=sample /etc/exports]
/mnt/disc0_1	*(ro,no_root_squash,insecure,no_subtree_check)
/mnt/disc0_2	*(rw,root_squash,insecure,no_subtree_check)
Finally, start portmap and knfsd (nfsd when using the user space implementation):
[label=starting the daemons]
# /etc/init.d/portmap start
# /etc/init.d/knfsd start
Failsafe mode is very useful if you misconfigured your WLAN router, so that you can not access it anymore. E.g. if you accidentially disabled secure shell or misconfigured the firewall, so that you can not login any more.
When in failsafe mode, the device won't interpret any networking setup files. It stops even before fwcf is set up. It will just set the LAN interface up and give it the IP address 192.168.1.1 and netmask 255.255.255.0. Then it will start a telnet daemon, so you get straight access (without depending on the installed SSH daemon).
To get FreeWRT into failsafe mode you need physical access to the device and the failsafe utility. The failsafe utility is built inside our ADK and is available in the directory bin/ after a successful build.
If you just want to compile the tool and not a complete firmware image, use following command:
[label=building the failsafe utility for the host system]
$ make subdir=tools/failsafe install
The tool just opens a network socket and waits for a special UDP packet from the WLAN router. FreeWRT sends the UDP packet via the first recognized network interface (eth0).
Connect your computer to the WLAN router via direct or crossed network cable. Use the failsafe port (in most cases one of the LAN ports), see the device specific page for the exact network port.
Configure your network interface to the IP address 192.168.1.2 with network mask 255.255.255.0. Now start the failsafe utility on your computer.
$ ./failsafe
After that power on your WLAN router and wait for the following message in your failsafe application running on your computer:
Press reset now to enter Failsafe!
As soon as this message is displayed you should push the reset button of your WLAN router. You have 2 seconds time to push the button. If you successfully enabled the failsafe mode, following message will be displayed:
Entering Failsafe!
Now you should be able to login to your WLAN router via a telnet application. Just use:
$ telnet 192.168.1.1
If you want to repair your configuration, you first need to mount the root filesystem. This is best done via:
# mount_root
After that you need to enable the FreeWRT configuration filesystem:
# fwcf setup
Now you can change files in /etc/ and repair your broken configuration. Do not forget to commit your changes afterwards.
# fwcf commit
If you want to start over with the default /etc/ directory, just remove the fwcf partition content with following command:
mtd erase fwcf
You can either use reboot -f or the option -r for mtd to reboot the system.